Monday 26 October 2015

Waste not, want not - pyschedelic stripes!

Love funky resin bangles? Hate waste? Here's an awesome way to use up your leftover resin for maximum effect. These psychedelic stripes put the fun back into funky!


 What you need:

- Two part epoxy resin
- Bangle moulds
- Resi-Tint Acrylic Inks

Method:

1. Mix up a batch of two-part epoxy resin to use in any other resin project. For this task I used Mastercast 1-2-1 resin by Chem Resins.


2. When you have finished your masterpiece, instead of chucking away your leftover resin, transfer it into a psychedelic stripe by mixing in a few drops of Resi-Tint Acrylic Ink.


 Easy does it - one or two drops are all you need for a vibrant, beautiful colour!


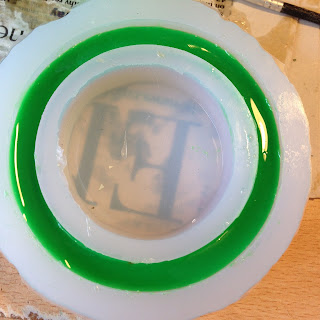
3. Pour a thin layer of tinted resin into a bangle mould. For this project I used a combination of moulds made by Resin8 and myself. You can get totally different effects using thin or chunky moulds.


4. Ensure that you have a thin layer of your first colour poured into the mould. Carefully remove spills along the sides using baby wipes.


5. Once your first colour has cured, you are ready to pour another thin layer of tinted resin. The layers don't necessarily have to be of equal height, depending on what effect you are going for.


6. Continue pouring layers of tinted resin onto cured resin until you have filled up your mould.


7. The end result? Some fantastic bangles. I think of these as "bonus bangles" because they are made out of leftover resin that may otherwise have been thrown away. Perfecto!


You can check out my Facebook page here or take a peek at my Etsy shop here.

Colour your resin!

Who says resin has to be clear?  From psychedelic stripes to subtle hues, there are many ways to add colour to your resin collections. You can even sing (or paint) a resin rainbow, should you wish to do so!


I was recently asked to test out four of Chem Resin's new Resi-Tint Acrylic Inks - a series of vibrant colours specially designed to be used with resin. Eli-Chem Resins have produced these acrylic pigments to be used for paintings and sculptures - but they can just as easily be used to add some va-va-voom to resin jewellery.

In the past I've used alcohol ink to tint my resin creations so was interested to see how Resi-Tint stacked up in comparison. I tried out Turquoise, Emerald, Flame Red and Scarlet.


Resi-Tint pigment versus alcohol ink

The first difference between Resi-Tint and alcohol ink is that a little bit of Resi-Tint goes a very long way! Eli-Chem recommend mixing up one part of Resi-Tint to 1000 parts of resin.

I certainly found that one or two drops is all you need to colour about 300ml of mixed up epoxy resin - so go easy on how much you pour into your resin!

Luckily the pots come with handy droppers so it's easy to mix up the amount you require.

29.5 ml of Resi-Tint should last a very long time - which makes a bottle (retailing at £9.90 - or about $15) pretty economical if you're planning to do a lot of tinting and colouring! The colours are vibrant and tend to come out more opaque than alcohol ink (unless you mix up an enormous batch of resin)!

Here is a rose petal bangle I made, using turquoise Resi-Tint, Alamould bangle mould and Mastercast 1-2-1 two part epoxy resin.


Verdict

All in all I was very pleased with the different effects I was able to achieve using Resi-Tint. Although it's hard to obtain a very subtle hue unless you mix up a huge batch, it is a very versatile pigment - offering an enormous range of effects. The only limit is your imagination!


Flower bangle using clear resin poured in together with turquoise and flame red Resi-Tint pigments.
Made using emerald Resi-tint and resin mixed into a silicone leaf mould.
Bangle featuring pieces of quail egg shell and sequins with scarlet Resi-Tint.


Click here for a resin tutorial showing you how to make this funky psychedelic stripe bangle using Resi-Tint!

You can check out my Facebook page here or take a peek at my Etsy shop here.


Thursday 24 September 2015

New resin gun tested!

Are bubbles causing troubles with your resin work? Fed up with pieces that never properly cure? A revolutionary new resin gun system has got me all fired up! 

If you've ever worked with resin, you've probably been there. You've carefully measured out your two part epoxy resin, mixing up the resin with the hardener. You've dutifully followed the instructions, mixing up the parts with a lollipop stick. And then disaster! Pesky bubbles rise to the surface! Or you spill a glob of resin all over your beautiful bezel! Or perhaps you've messed up your ratios somehow and ended up with a tacky mess that never fully cures. If so, the resin gun system may be for you!

I was thrilled when leading UK resin manufacturer Eli-Chem Resins recently asked me to test drive their brand new MasterCast 1-2-1 resin gun system. Could it really live up to its expectations?


Method

1. Unclip the hinged bracket at the front of the resin gun and tilt it forward.


2. Insert the plunger into the gun handle by pressing up on the metal release bracket at the back and sliding the plunger through the slot. Ensure the hole of the plunger faces backwards and the grooved side is facing down. Push the plunger all the way through.


3. Insert the dual-barreled cartridge into the retaining bracket and snap it down across the top of the gun so it locks with a click.


4. Remove the cartridge cap and fit the mixing nozzle to the front of the cartridge. Once it locks securely into space, it's time to get creative!


 5. Slowly squeeze the trigger to release the resin. The first bit of liquid may have bubbles in it, so you may wish to discard it. The rest is ready to use! Working in a well ventilated space and preferably wearing gloves, slowly squeeze the trigger to dispense the resin. Here I've used it to dome some bezels I've prepared earlier.


6. When you have finished your project, replace the cap on the cartridge for future use. Make sure you dispose of used nozzles and cartridges safely.


The verdict

A small cartridge of MasterCast 1-2-1 resin goes a fairly long way! It may not look like much but one of those little cartridges was enough to dome 30 bezels, gloss the top of a pre-sanded bangle, fill up six small moulds and start the first layer of a large, thin bangle mould! Not bad!


The thin nozzle was ideal for getting into small spaces and because it was all so tidy, there were no spills or wasted resin. After wrestling with cocktail sticks, lollipop sticks and toothpicks, this was a bit of a revelation.

The kit was surprisingly easy to put together - even for a relative technophobe like me! Once assembled, it was so simple and quick to use that I instantly fell in love with this system.

Starter kits retail at £25 (about $38) each and include a reusable resin gun, two pre-filled cartridges and six mixing nozzles. Replacement cartridges cost £8 each (about $12) while mixing nozzles cost 30p (about 46 cents). As long as the nozzle is replaced on the cartridge, it should last for two years.

Pros: great for beginners, artists working on small projects and very precise work where you want to get into small spaces. There is almost zero waste and quality is guaranteed every time. An absolute beginner could pick it up and use it in almost no time at all! This is also a great solution if you're wishing to test out Eli-Chem's MasterCast 1-2-1 resin without committing to buying big containers of resin.

Cons: The cost may make it restrictive for experienced artists wishing to work on big projects.

Overall: A fantastic bit of kit that may well revolutionize resin!

Less than 24 hours on, here are some of my creations using the Eli-Chem resin gun!


To find out more about Eli-Chem products click here.

For more of my creations check out my Facebook page! Do pop by and say g'day :)